How to Install Minecraft Mods: Detailed Guide


Minecraft is a sandbox game that has rightfully captured the hearts of millions of players worldwide. Despite being released quite some time ago, Minecraft remains popular among players of all ages. This is because it features an open world where you can do anything you desire. However, the true greatness of Minecraft is unlocked through the use of mods, which significantly expand the game’s functionality by adding new items, creatures, mechanics, and much more. In this guide, we will take a detailed look at how to install mods for Minecraft, including all popular mod loaders.
Mods (modifications) are user-created additions to the game that change or add new content. For example, new weapons, items, clothing, armor, buildings, biomes, mobs, and much more. They can also add new textures and even complex mechanics and features, transforming the game beyond recognition.
Step 1: Determining the Version of Minecraft for Mod Compatibility
Before installing mods, you need to ensure that the version of the game you have installed is compatible with the mods you intend to install. Some mods may only work with certain versions of Minecraft, so it’s important to choose the appropriate version of both the game and the mods.
Often, when downloading a mod from any website, you can see which version of the game it is designed for. For example, a mod for version 1.20.4 will only work on that version. However, some mods might work on versions of the game that are not listed in the mod's requirements, but in most cases, they will produce many errors and bugs. In rare cases, they can even break the game. Therefore, pay attention to the mod’s compatibility with the installed version of Minecraft on your PC or other devices.
Supported Versions:
- Minecraft Java Edition: The main version of the game, supporting the majority of mods.
- Minecraft Bedrock Edition: Supports mods, but with limitations compared to Java Edition.
Additionally, there are many versions of Minecraft, and you need to select the appropriate mods for each version.
Step 2: Installing Java (Only for Minecraft Java Edition)
To run mods in Minecraft Java Edition, you need to have Java installed. Minecraft itself runs using this component, and mods also require this environment. Since this library is mandatory for the game, you likely already have it installed. If not, follow the instructions below to download and install the Java component on your computer.
Installing Java:
Visit the official Java website.
Download the latest version of Java compatible with your operating system.
Install Java by following the on-screen instructions. Simply run the installer you downloaded earlier and follow its subsequent prompts.
Step 3: Choosing and Installing a Mod Loader
To install and use mods, you'll need a mod loader, which enables the integration of mods into Minecraft. These are specialized sets of libraries on which most modifications are built. There are several popular mod loaders, each with its own features and support for different mods.
Below, we will provide detailed instructions on how to install each of them.
Keep in mind that a mod designed for one loader will not work on another! Therefore, pay close attention to the requirements when downloading mods.
Important: Note that some loaders have a .exe installer for Windows. This article does not cover the process in detail. All you need to do to install such a version is to download the installer .exe file, run it, and follow the setup program's instructions. The entire process is practically automated.
Forge

Forge is one of the most popular mod loaders for Minecraft Java Edition. It supports a vast number of mods since it is one of the first of its kind. The majority of mods and add-ons are created specifically for Forge. Therefore, if you download a mod, it is most likely supported by Forge.
The installation process is incredibly simple and does not require any special knowledge. Follow the instructions below, and you’ll be all set!
How to Install Forge:
Find Forge on ModLand.
Choose the version of Forge compatible with your version of Minecraft.
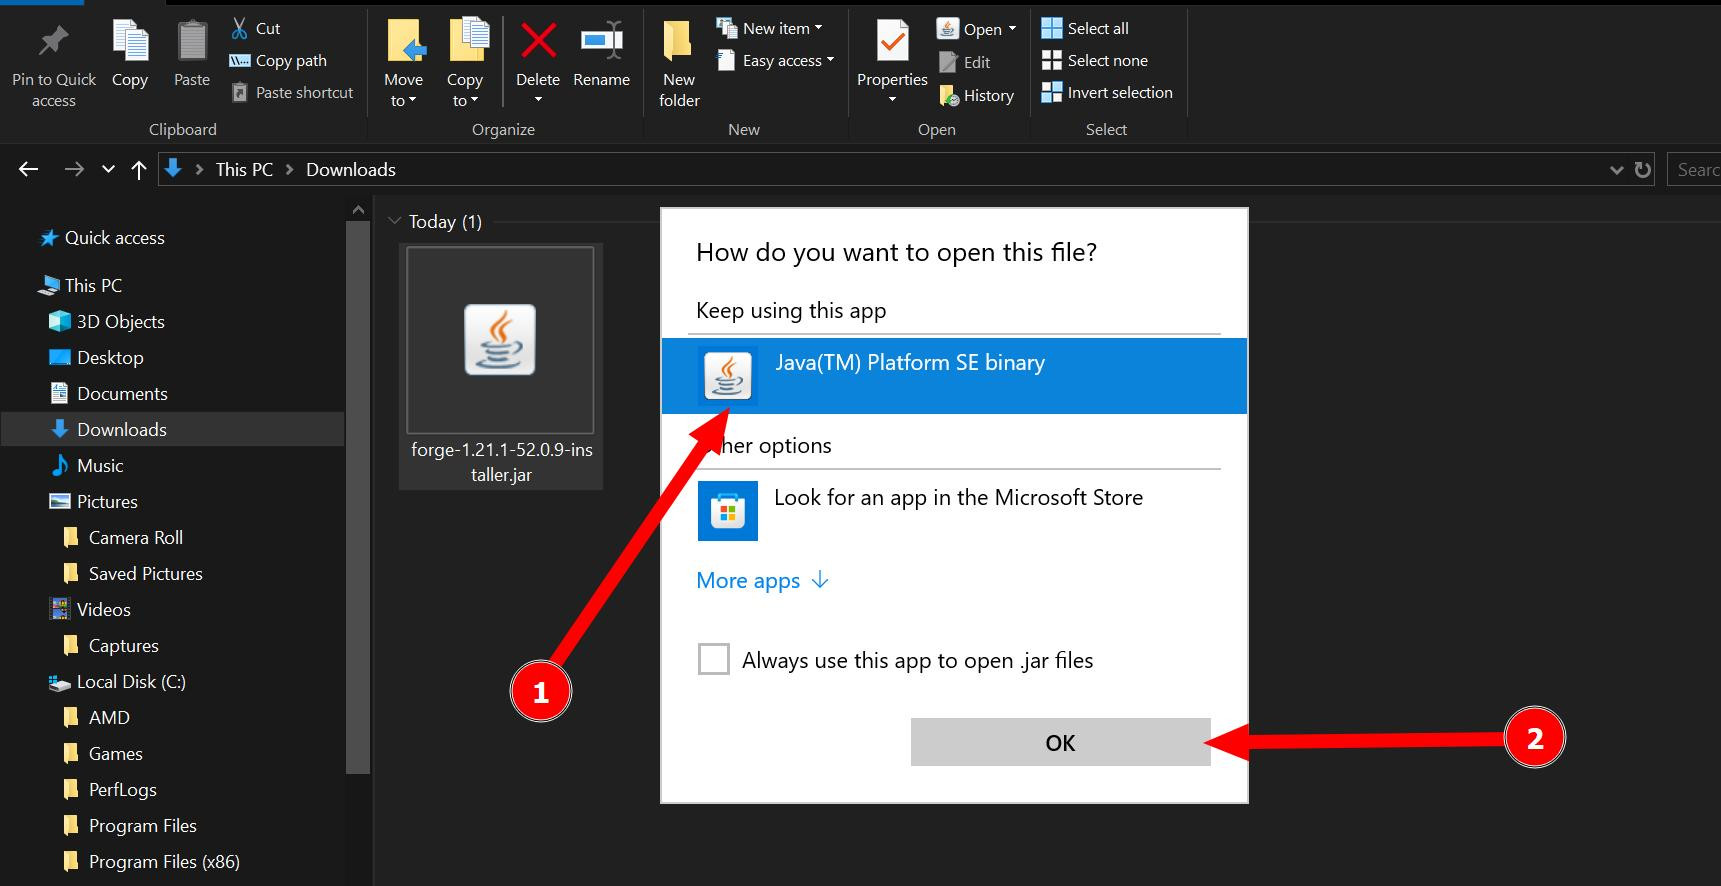
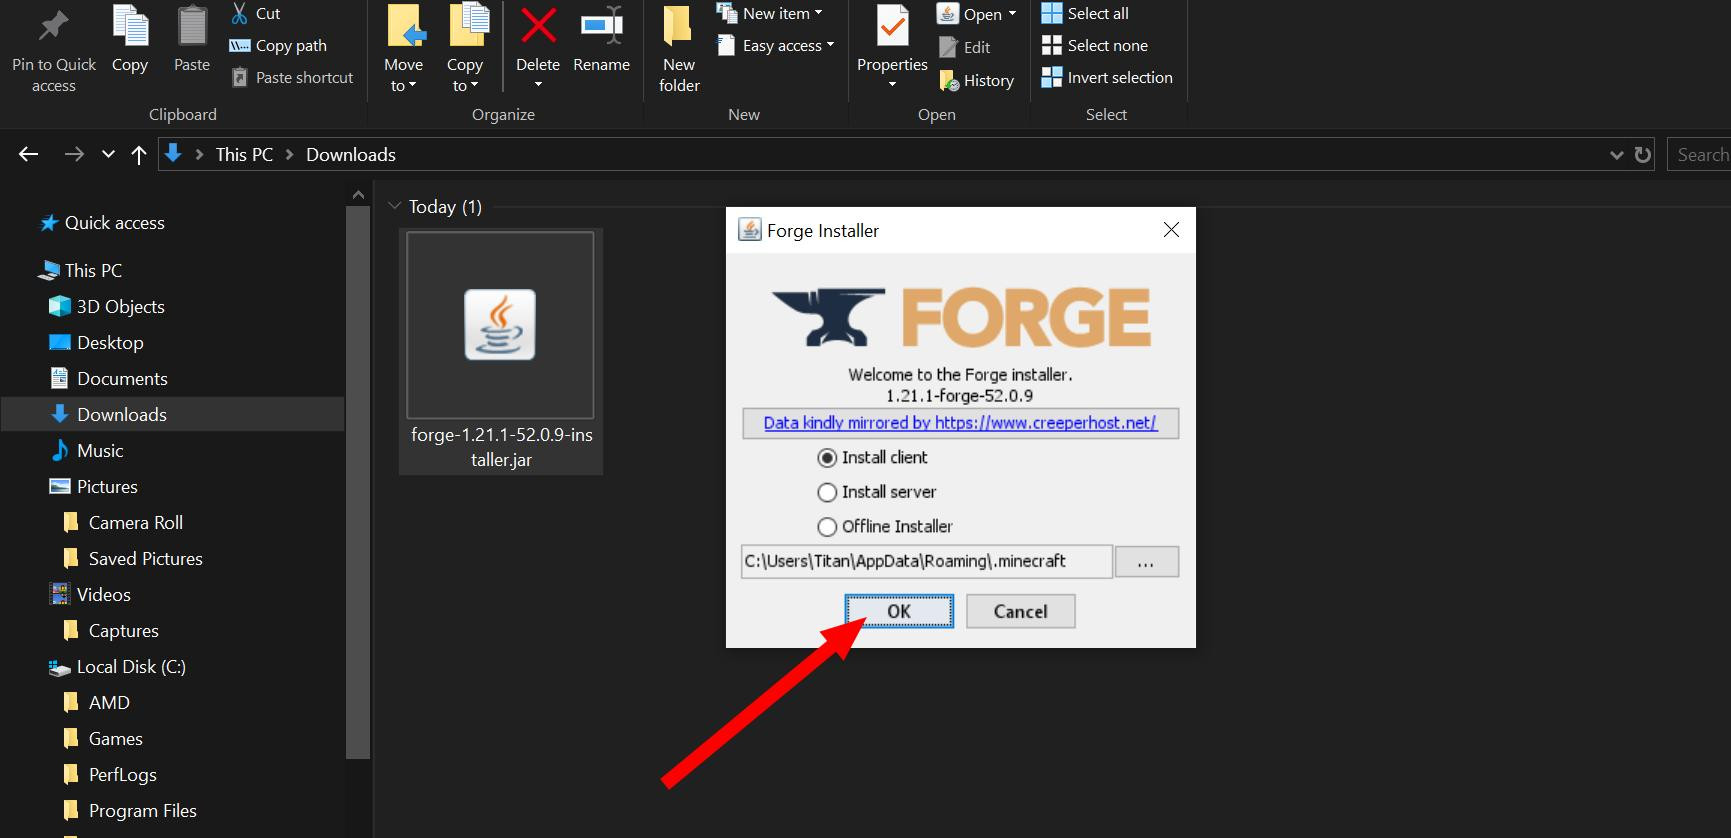
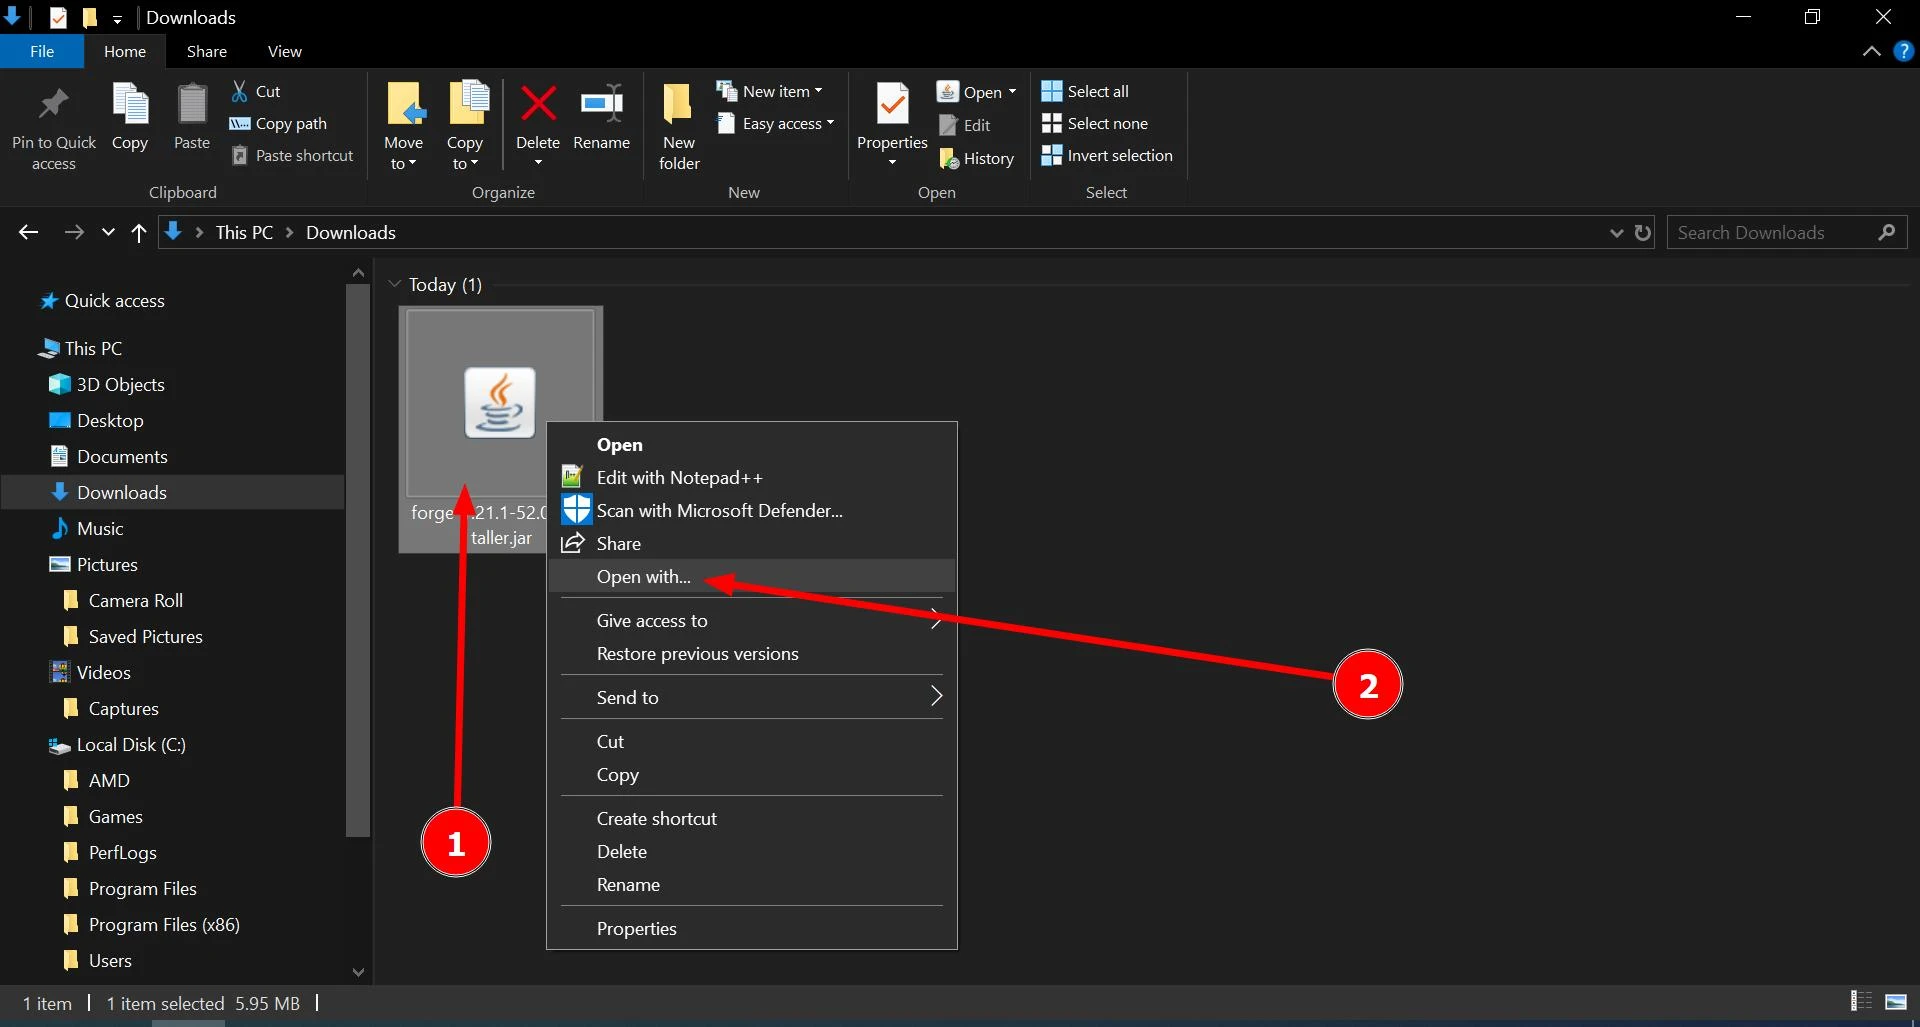
Download the installer and run it (you need to run the installer using Java JDK). If double-clicking the left mouse button doesn’t open the installation window, right-click it and select "Run with Java"

In the installer, select the installation type (for regular gameplay, choose "Client") and click "OK."

After installation is complete, launch Minecraft Launcher and select the Forge profile.
Fabric
Fabric is a lightweight and fast mod loader that also supports many mods and has an active developer community.
Its installation is very similar to the Forge mod loader installation. You can find the instructions below.
How to Install Fabric:
First, download the installer from the Fabric page on ModLand.
Then, run the installer by right-clicking on it and launching the file through "Java." The process is similar to Forge.
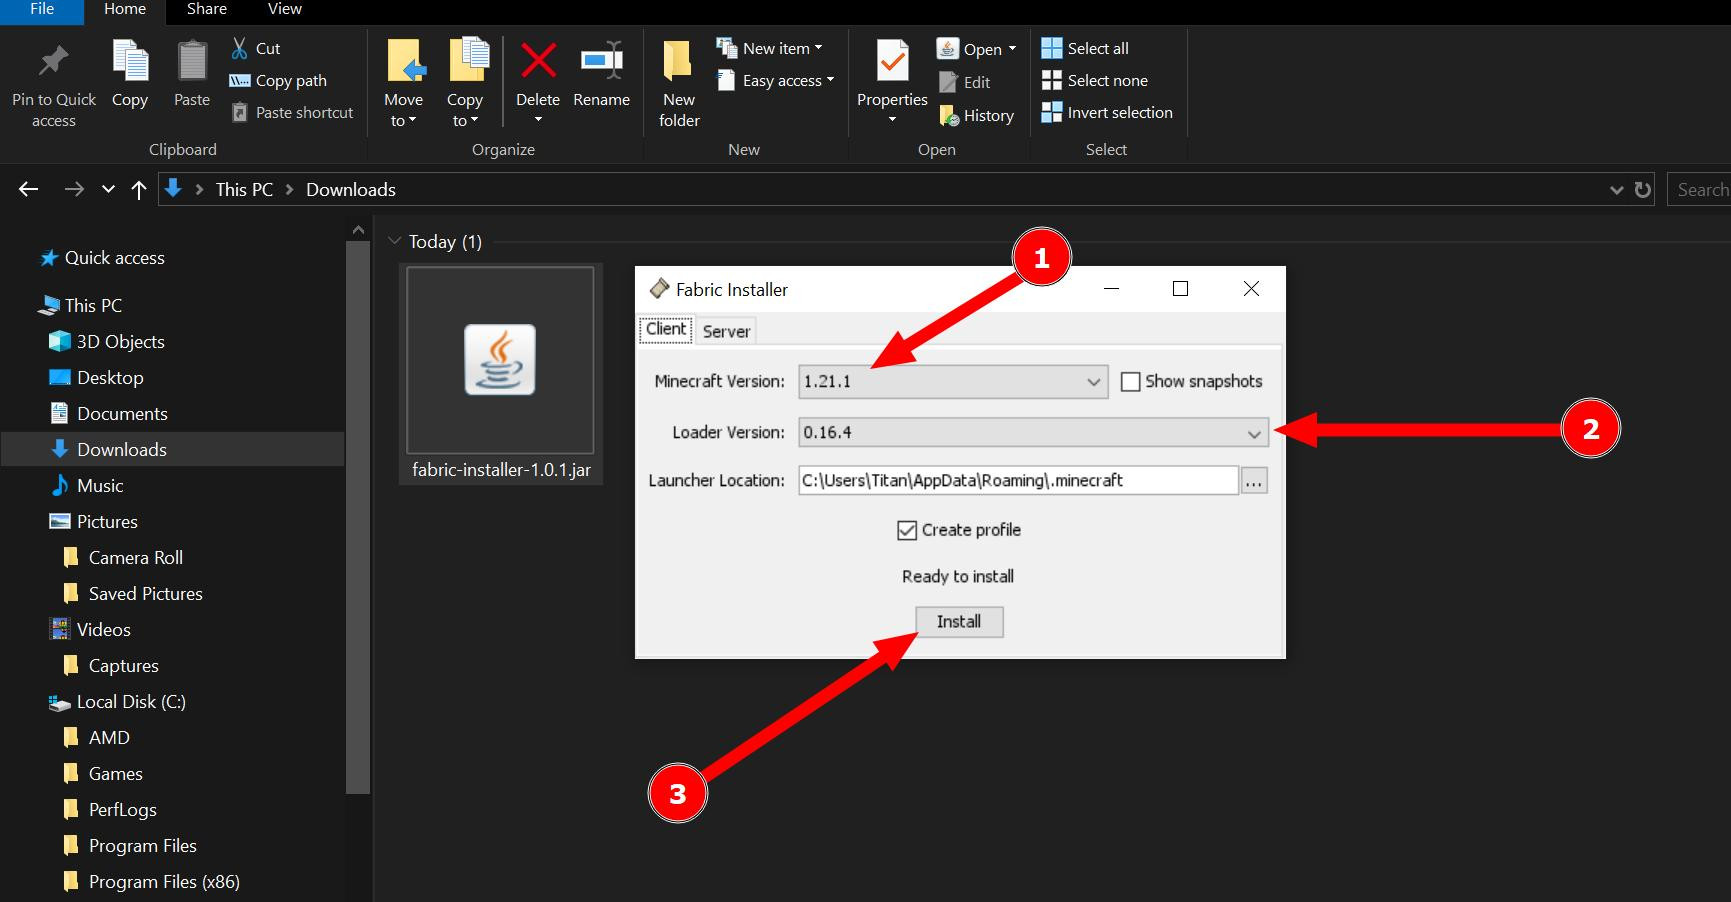
In the installation window, select the Minecraft version and click "Install."

You also need to install Fabric API. This is an essential component for many mods to work. The installation is straightforward: download the Fabric API file for your Minecraft version and copy the .jar file into the .minecraft/mods folder.
Once the installation process is complete, you can launch Minecraft Launcher and select the Fabric profile to start using all the compatible mods.
Note: For Quilt and Fabric, there is no need to select and download a specific file for the required version. The installer for all versions is unified! The version of Minecraft is selected within the installer program itself.
As you can see, the installation process is very simple and does not require much effort. Note that the installation of other loaders is similar. But if you encounter any difficulties, we have also provided similar instructions for Quilt and NeoForge, which you can find below.
Quilt
Quilt is a relatively new mod loader that emerged as a continuation of Fabric, offering improved performance and mod support, according to the developers. While there are not many modifications available for it yet, this API is quickly gaining popularity, and some popular mods now require this library. Let's learn how to install it.
Important: To install Quilt, you must have Java JDK 17 installed! If it's not installed and you encounter an error, install this component and try the installation again.
How to Install Quilt:
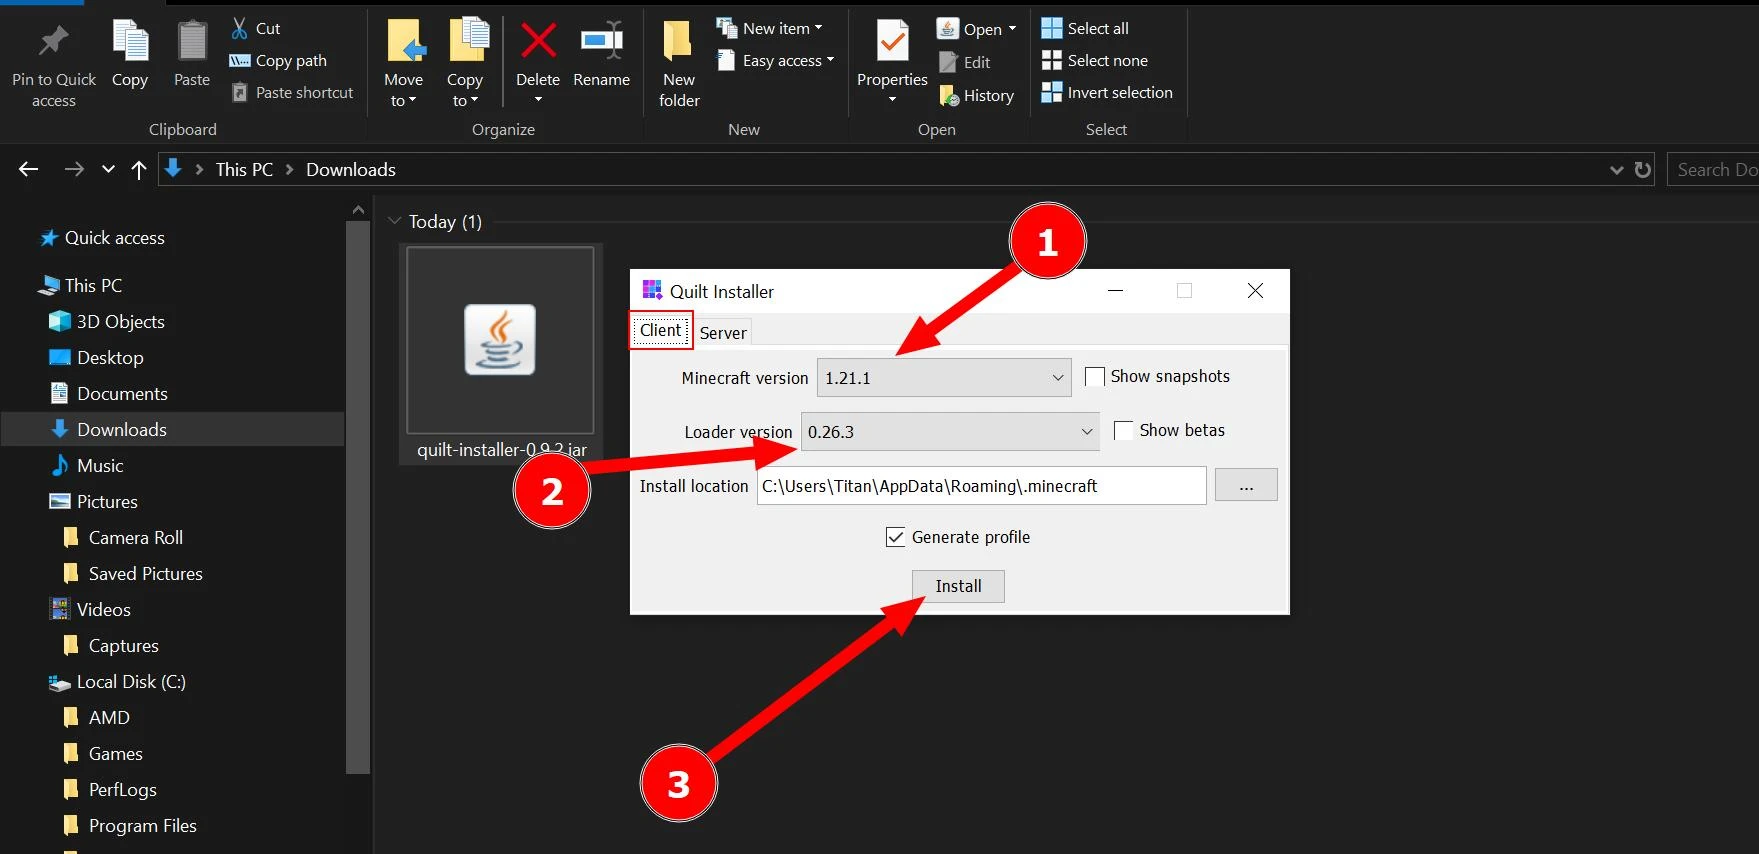
Download the Quilt installer.
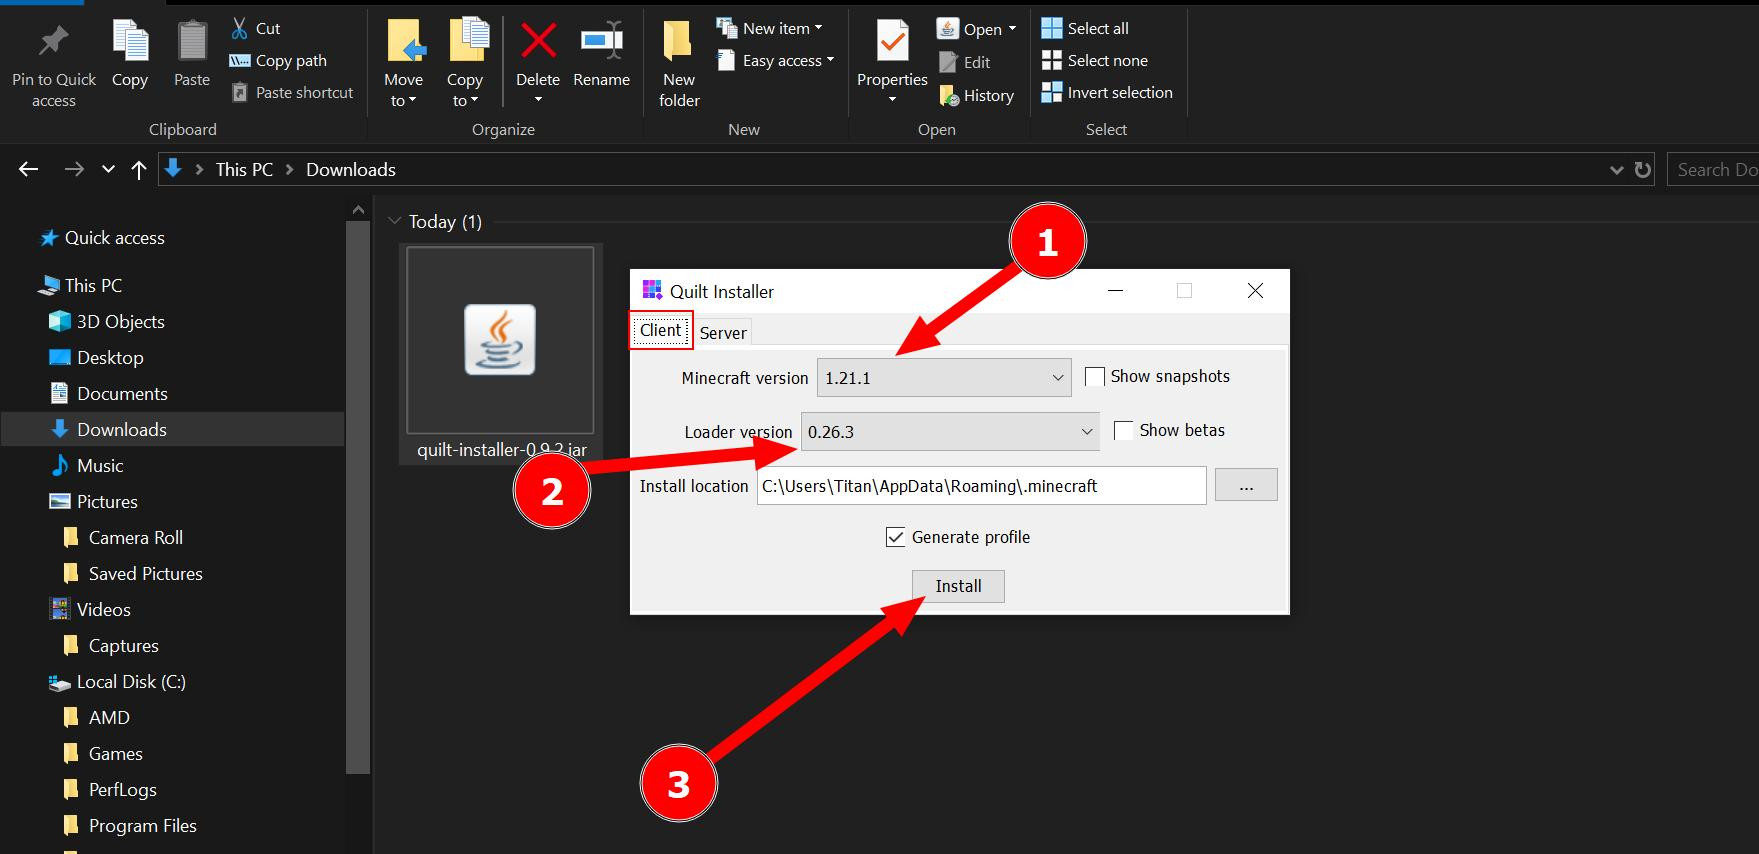
Run the installer and select the Minecraft version for which you want to install Quilt.
Click "Install" and wait for the installation to complete.
At this stage, you need to download the Quilted Fabric API and place the .jar file in the .minecraft/mods folder without unpacking it.
Open the Minecraft Launcher and select the Quilt profile. Now, when you choose this loader in the launcher, the compatible mods will work in the game.
NeoForge
NeoForge is a mod loader created as a continuation of Forge, aimed at improving stability and performance, as well as supporting more modern and innovative features. NeoForge strives to offer a more optimized and user-friendly environment for both mod developers and users.
Let's go over the installation process. It is very similar to the previous ones since it also uses the Java environment. Therefore, the installer is the same.
How to Install NeoForge:
Select the version of NeoForge compatible with your version of Minecraft and download the necessary file to your computer.
Run the installer and click the "Proceed" button.
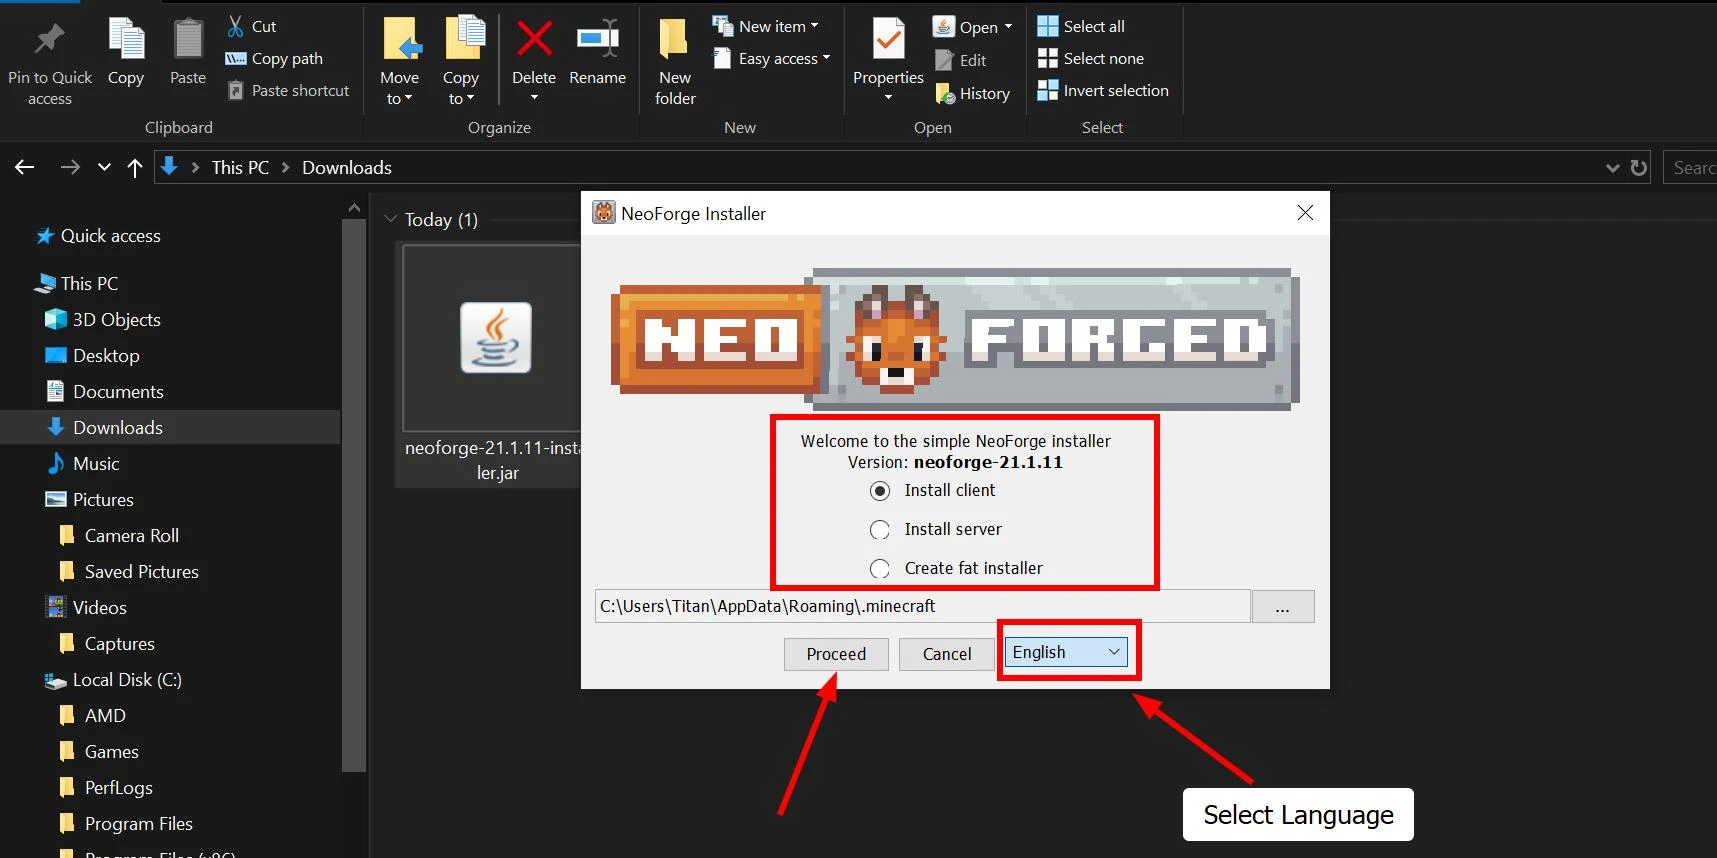
Wait for the installation to complete. After that, NeoForge will be available in the Minecraft Launcher. By selecting it, you will launch Minecraft with this component.
Encountering an error during the installation of Quilt, Forge, NeoForge, or Fabric? In that case, launch the Minecraft Launcher, open the game, and minimize it. Then, relaunch the installer and try installing with the game running and minimized in the system tray.
Step 4: Installing a Mod for Minecraft
Now that you have downloaded the mod and installed the mod loader, you can proceed to install the mods in Minecraft.
At this stage, everything is quite simple. The most challenging part was installing and choosing the mod loader. The mod installation process itself is very straightforward and convenient. Below is a guide on how to install any mod for Minecraft. Keep in mind that this is a universal method suitable for all loaders.
First, locate where your game is installed.
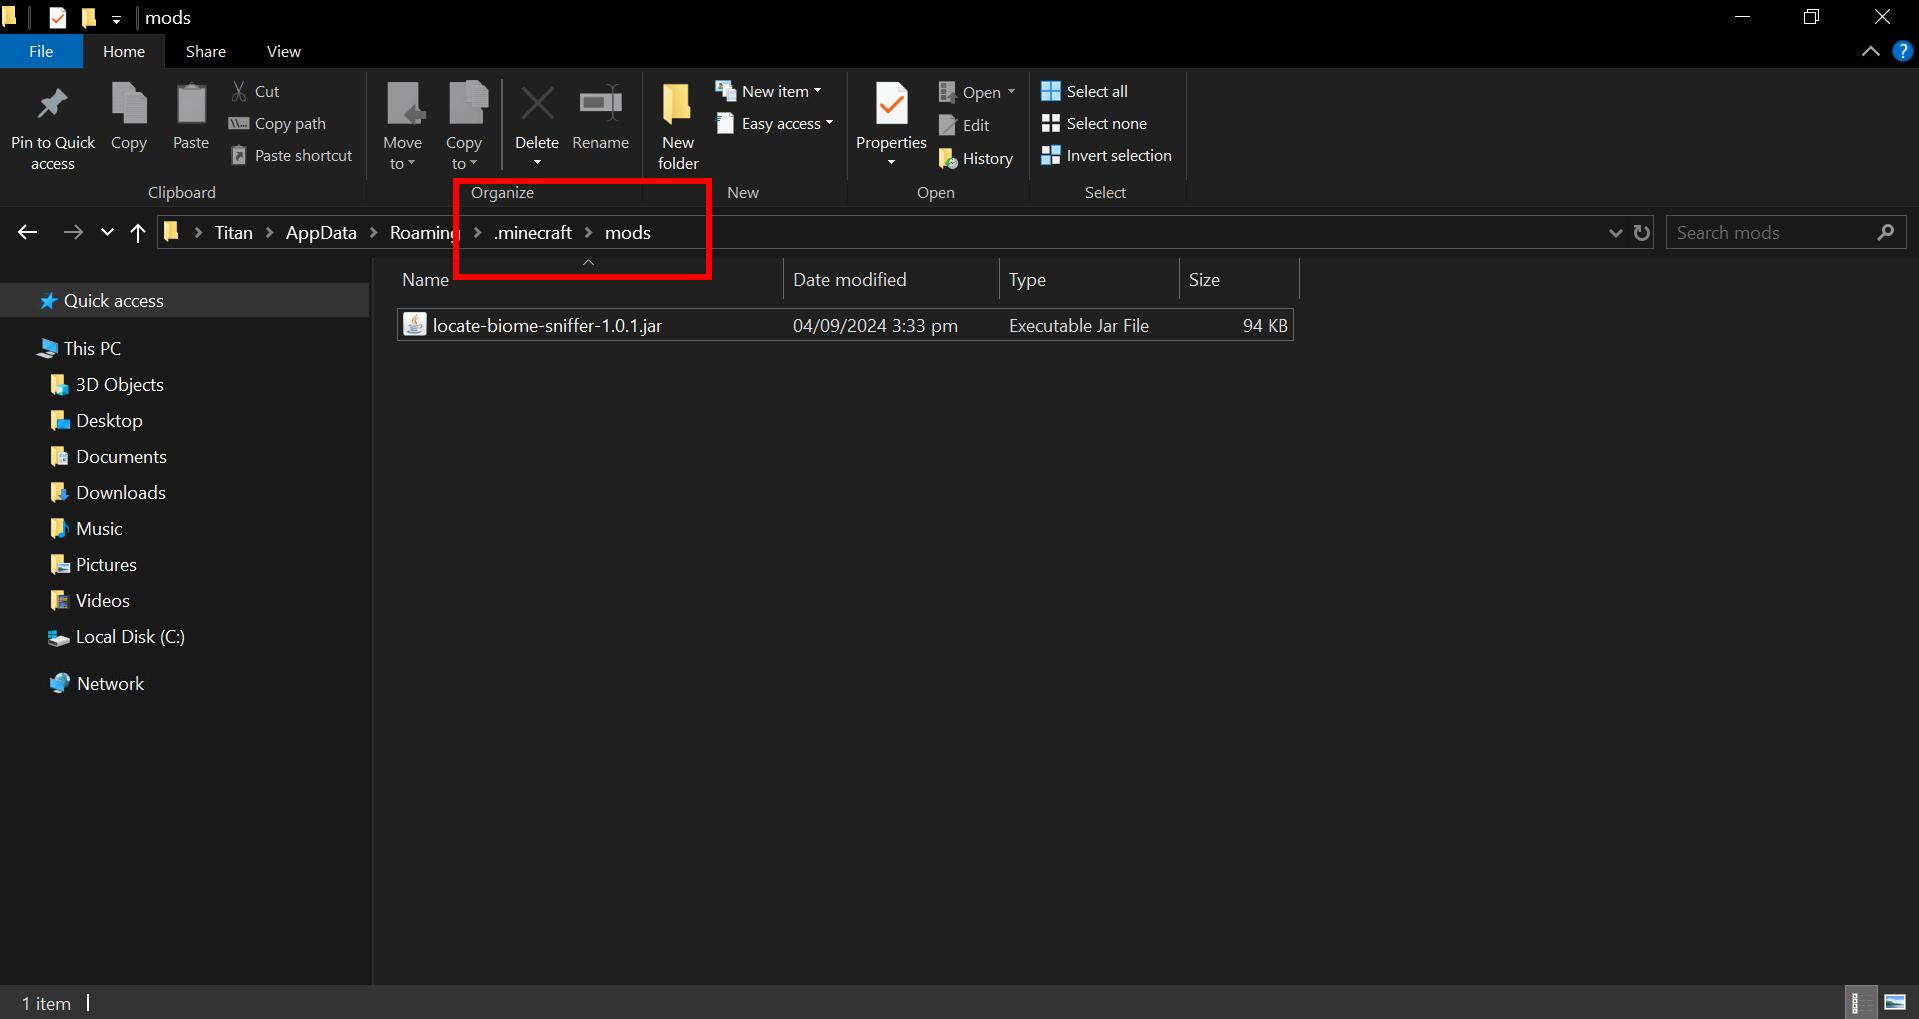
Then, navigate to the .minecraft folder (this is the main directory where the game is installed), and find or create a folder named mods if it doesn't already exist.
All that remains is to copy the modification you want to install into the mods folder.

Done! The mod is installed! Now you can launch Minecraft with the Forge/Fabric/Quilt/NeoForge profile and check if the mod appears in the game.
Minecraft Mod Not Working: Problem-Solving
When installing mods, you may occasionally encounter various problems. Although this is quite rare—most mods work fine without any issues—errors can sometimes occur.
Identifying the problem without knowing the cause can be quite challenging. Therefore, we will provide some general tips that might help you resolve the issue when a Minecraft mod is not working. Often, the problem can be fixed with the simple steps outlined below.
Here are some general solutions:
Mod Conflicts: Sometimes, mods can conflict with each other, which happens relatively often. If two mods conflict, try disabling one of them and checking the game. It’s best to remove it from the mods folder entirely and see if the issue persists. If the mod works afterward, it likely conflicted with the removed mod. The conflict might involve several mods, so try removing each one sequentially until the primary mod works. Just make sure to back up all your modifications before performing these steps to avoid losing them!
Version Incompatibility: Ensure that the mod version matches the version of Minecraft and the mod loader. When launching the game with the loader enabled, you will see a message if the mod is not compatible. When downloading a mod from websites, the compatible loader is always specified. So, verify this information and use the correct version of the game and mod loader.
Errors During Mod Loader Installation: Sometimes, the loader itself may be installed incorrectly, leading to errors. If you encounter an error, try reinstalling the mod loader.
Console Errors: If mods are causing a crash, open the Minecraft console (if enabled) and review the error output. It usually contains valuable information about the cause of the issue.
Problematic Mods: Occasionally, you may come across mods that are faulty by themselves. If the solutions above don’t help, delete the malfunctioning mod and try downloading it from another site. If this still doesn’t work, the mod is likely non-functional, and only the developer can fix it. Therefore, you may want to contact the mod’s author for assistance with the installation.
That's it! Now you know how to install any mods for Minecraft.
Mods will open up a truly limitless world of possibilities. They can significantly alter the game and make it unrecognizable by adding many new elements to the gameplay.
If you have any questions, feel free to ask them in the comments. The moderators and users of ModLand will be happy to help you solve such problems. See you soon, and happy gaming!
Added by
![NeoForge Installer [Minecraft 1.21.1, 1.20.6 - 1.20.1]](https://i2.modland.net/i/66c5cbeb7e5ee/neoforge_modland.webp)
![Timeless and Classics Zero (TaCZ) [Minecraft 1.20.1, 1.19.2, 1.18.2]](https://i2.modland.net/i/669683678b42d/description_0ac47139-8e79-4b76-8a0c-d79bcb9039df_modland.webp)
![Armor Durability HUD [Minecraft 1.21.4, 1.21.3, 1.21.2, 1.21.1, 1.21]](https://i2.modland.net/i/674bc2c2c404b/190618141923060623_modland.webp)
![[1.5] THE DROPPER](https://li1.modland.net/minecraft/maps/thumbnail/th_ModLandNet_1.jpg)


![MrCrayfish’s Furniture [Minecraft 1.20.1 - 1.7.10]](https://i2.modland.net/i/666364596b874/screenshot3_modland.webp)